Pipeline - Bitbucket to AWS EC2 over SSH
This Pipeline – Bitbucket to AWS EC2 helps us to transfer and receive data over ssh. Along with that, we will learn how to automate deployment from the bitbucket repository to AWS EC2. Here we will use the Rsync utility.
Introduction:
Rsync is famous for its delta-transfer algorithm, which reduces the amount of data sent over the network by sending only the differences between the source files and the existing files in the destination. By default, Rsync will upload the whole directory to the target.
Assumption:
- You are already done with the setup of the AWS EC2 instance and have the private key as a .pem and public key as a .pub file. Also, you have configured the public key into the ~.ssh/authorized_key file.
- You have a bitbucket account and one repository for which you have to configure the pipeline.
Prerequisite:
Firstly, you need administrator access to create the bitbucket pipeline. Else you will not see the Pipelines option in the bitbucket Repository Settings.
Step 1: Create a Pipeline
Pipeline ⇒ Starter pipeline (template) ⇒ Commit
In the left corner there is a section for Pipelines, click bitbucket to AWS.

You will get a below screen, where you can create a bitbucket pipeline, select any of the templates as of now because we will later change it according to our need.

After that, commit that file.

After committing the file, the directory structure will look like below

Secondly, Open the bitbucket-pipeline.yml file in online edit mode and paste our below continuous deployment pipeline code.
Source ⇒ bitbucket-pipeline.yml

# Push artifacts to ec2 destination using rsync

image: node:10.15.3

pipelines:
  default:
  - step:
        name: Deploy artifacts using rsync to $SERVER instance
        script:
          - pipe: atlassian/rsync-deploy:0.3.2
            variables:
              USER: $USER
              SERVER: $SERVER
              REMOTE_PATH: '${REMOTE_DESTINATION_PATH}'
              LOCAL_PATH: '${BITBUCKET_CLONE_DIR}/'
              EXTRA_ARGS: "--exclude=.bitbucket/ --exclude=.git/ --exclude=bitbucket-pipelines.yml --exclude=.gitignore"
          - echo "Deployment is done...!"
USER: username by which we ssh to instance
SERVER: IP or public dns of ec2
REMOTE_PATH: remote target directory
LOCAL_PATH: build directory
EXTRA_ARGS: variable is used for exclude files and folder which we don’t want to push to EC2 instance. Your pipeline is ready, but what about EC2 access? How do access EC2 instances through this pipeline? For that our most important next step will be to configure the SSH connection.
Step 2. Configuring SSH
Repository Setting ⇒ PipelineSection ⇒ SSH keys

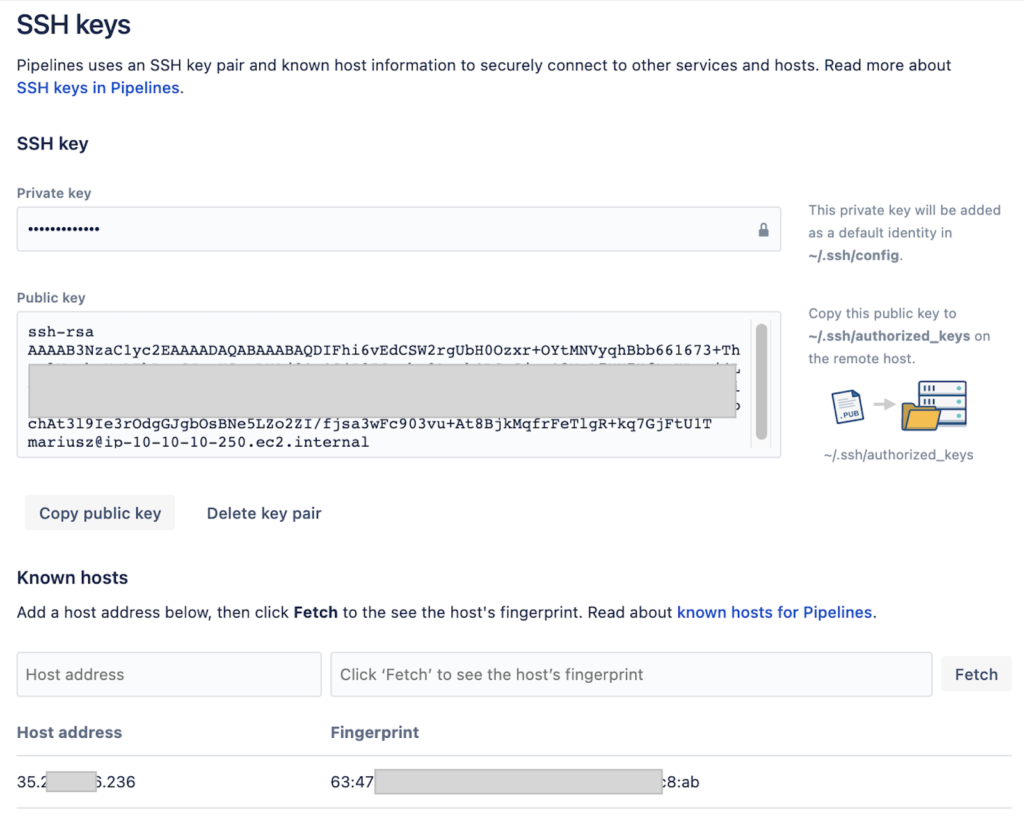
Now you will get the following screen.

Here, you have to paste your public key ( .pub ) content into the public-key section.
Note: The same public key content must be in ~./ssh/authorized_key file in EC2 instance.Repository Setting ⇒ Pipeline Section ⇒ SSH Keys ⇒ Public key
And private key( .pem ) content into the private-key section.
Repository Setting ⇒ Pipeline Section ⇒ SSH Keys ⇒ Private key
You need to add the Host address and click on the Fetch button until it gives Fingerprint values. If you don’t configure this step then the pipeline will give an error : Could not resolve hostname key.

Step 3: Configure the env variables
This step is optional, if you configured hardcoded values in bitbucket-pipeline then we don’t need to use these variables, but as a best practice we used Repository variables. Here you will not able to create any repository variable directly unless and until you enabled the pipeline, so first enable pipeline:
Repository Setting ⇒ Pipeline Section ⇒ Setting ⇒ Enable pipeline

Now we can configure variables.
Repository Setting ⇒ Pipeline Section ⇒ Repository Variable

Add required variables and their values.

That’s it, our pipeline is ready now. For implementing a pipeline, just push any code or add any file to the repository and commit it, Bitbucket will automatically run the pipeline. You can see the result or processing pipeline in the Pipeline section.
Step 4: Final Output
Click on Pipeline Section

Conclusion:
This pipeline automatically triggers when any commits happen in your master branch and push all the data from the repository to the EC2 instance. You can configure it for any other branch also.

Hello, I would like to subscribe for this blog to obtain most recent updates, thus where can i
do it please assist.
Hello, I hope you are doing well, thanks for notifying subscribe option. I have added subscribe option, please subscribe and enjoy my blogs. I will be going to start writing on edge computing soon. so, stayed tuned! Have a nice day.
Hi to every one, the contents present at this website are
in fact amazing for people experience, well, keep up the nice
work fellows.